Getting Facebook traffic is easy. Getting traffic that actually reaches your site, stays long enough to matter, and doesn’t waste your budget is harder.
That’s where most beginners lose money. In Meta Ads Manager, launching a campaign takes only a few clicks. The setup choices behind it—objective, tracking, audience, placements, and optimization—have a much bigger impact on traffic quality than most people expect.
This guide walks you from zero to a live campaign using Meta’s current flow as of 2026, though some labels may differ by account or region. The interface changes. The core principles don’t: install tracking before you spend, optimize for meaningful visits, and be skeptical of cheap clicks.
Before you buy traffic, define what “good traffic” means
If success means “I got a lot of clicks,” Meta can deliver that. The problem is that clicks alone are a weak signal.
The metric that matters more than clicks: landing page views
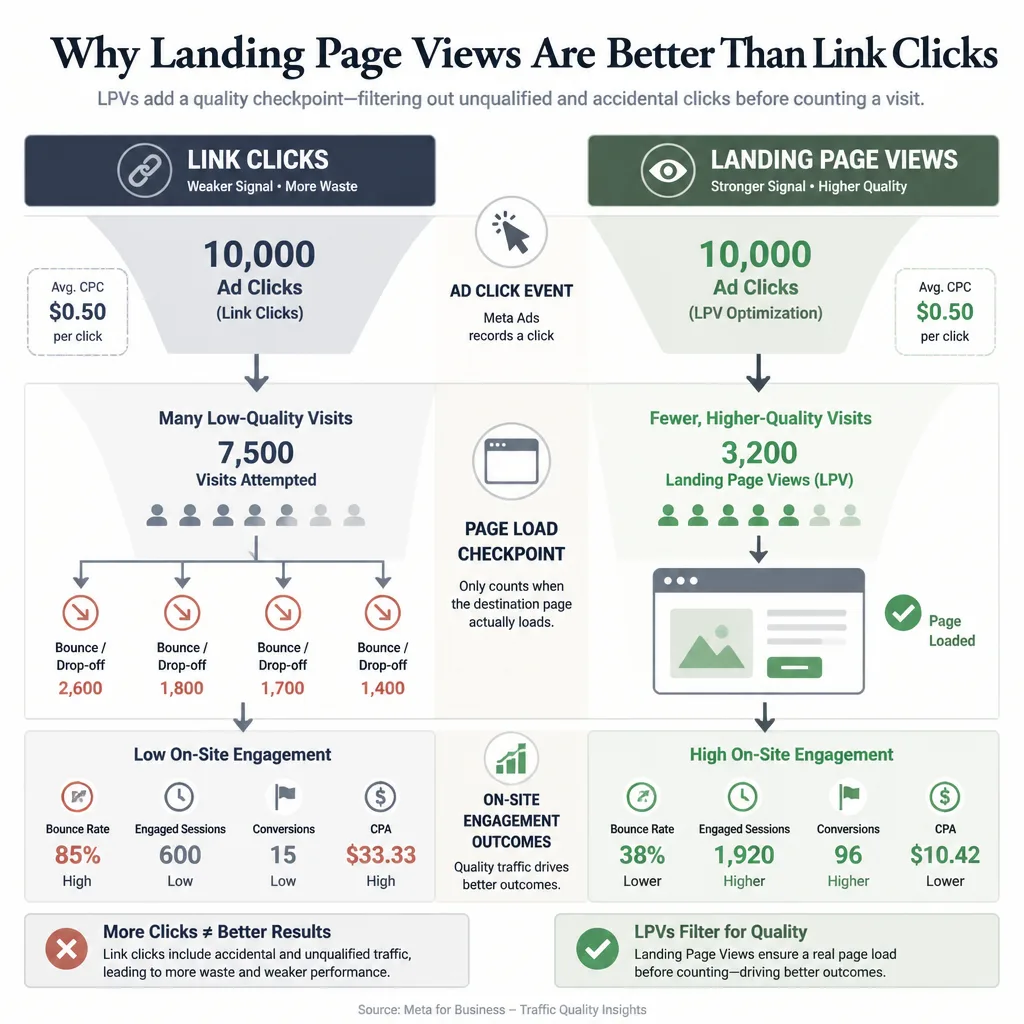
For website traffic campaigns, landing page views are usually a better optimization target than link clicks. A link click only tells you someone clicked. A landing page view means the page actually began loading, which filters out some accidental or low-intent clicks[^1].
That still doesn’t guarantee quality. A visitor can arrive and bounce. But it’s a stronger checkpoint than raw click volume.
A simple way to think about traffic quality:
- Link clicks show who clicked.
- Landing page views show who actually reached the page.
- On-site engagement shows whether the visit had value.
- Leads or sales show whether the traffic helped the business.
If CPC looks cheap but landing page views are weak and engagement is poor in Google Analytics, you’re probably buying low-value traffic—not efficient traffic.
When the Traffic objective is the right choice—and when it isn’t
Choose Traffic when your main goal is to send people to a page and you don’t yet have enough conversion data for Meta to optimize reliably for deeper actions[^2].
Good use cases include:
- blog content
- service pages
- product collection pages
- early-stage testing
- building remarketing audiences
Traffic is not always the best choice, though. If your Pixel already records a steady stream of leads or purchases, Sales or Leads can produce better visitors because Meta can optimize for outcomes beyond the visit. In mature accounts, that is often true.
For a beginner starting from scratch, Traffic is usually the simpler place to begin.
Set up the account foundation in Meta
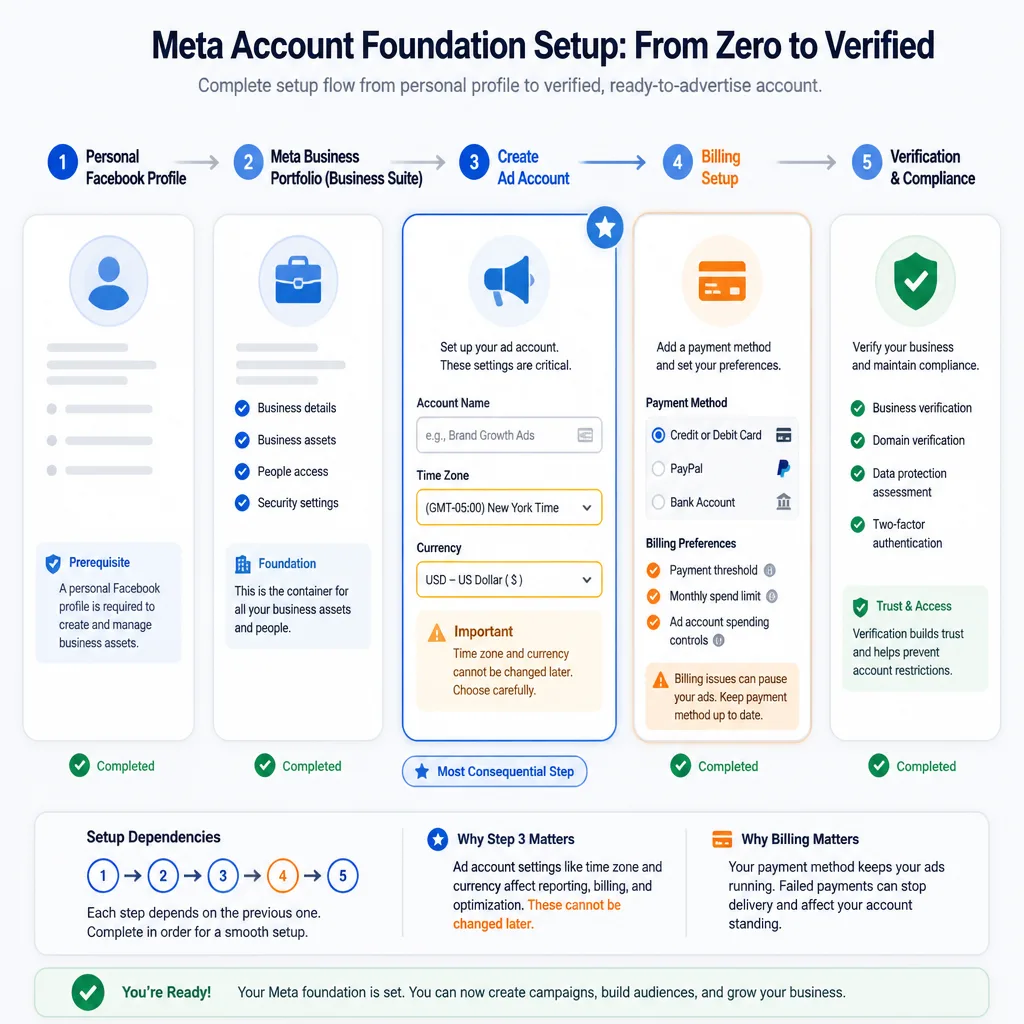
Before you launch anything, you need the basic business structure in place.
Create a Facebook profile if you don’t already have one
Meta generally requires a personal Facebook profile to access business tools. If you don’t have one, create it through Facebook.
You don’t need to use that personal profile publicly for ads, but you usually need it to create and manage business assets.
Create or access Meta Business Suite / Business Manager
Go to Meta Business Suite.
If you’re starting fresh:
- Create a business account or business portfolio.
- Enter your business name.
- Add your business email.
- Follow the remaining setup prompts.
Meta has changed this terminology over time. You may see “Business Portfolio,” “Business Manager,” or something similar. The function is the same: this is where your Page, ad account, Pixel, and permissions live.
Create an ad account
Inside Business Settings or the guided setup flow:
- Go to Business Settings
- Find Accounts
- Click Ad Accounts
- Click Add or Create a new ad account
Then fill in:
- Ad account name
- Time zone
- Currency
The last two matter more than beginners think. Time zone affects reporting. Currency affects billing and bookkeeping. Neither is always easy to change later.
Add a payment method
In Business Settings or Ads Manager:
- Go to Billing or Payment Settings
- Click Add payment method
- Add your card, PayPal, or local billing option
If possible, make sure the billing profile matches your business records. Payment mismatches often create avoidable account issues later.
Verify your business details if prompted
Meta may ask for identity confirmation, business details, or verification. If it does, handle it early. It’s much easier to solve before a campaign is live than during a spend interruption.
Connect your website and tracking before launching ads
A traffic campaign without tracking is guesswork.
Create a Meta Pixel in Events Manager
Go to Meta Events Manager.
Then:
- Click Connect Data Sources
- Choose Web
- Select Meta Pixel
- Name your Pixel
- Enter your website URL
- Click Continue
Meta now treats Pixel setup as part of a broader tracking stack that includes Meta Pixel and Conversions API. For a beginner traffic campaign, browser-side Pixel setup is enough to get started.
Install the Pixel using your platform or Google Tag Manager
Meta will offer several installation paths.
For most beginners, the easiest options are:
- native integration through Shopify or WordPress
- partner integration through your CMS
- Google Tag Manager
If your platform has a native Meta integration, start there. It usually reduces setup errors compared with manual installation.
If you’re using GTM:
- Copy the Pixel ID from Events Manager
- Open Google Tag Manager
- Add the Meta Pixel tag through your preferred setup method
- Fire it on all pages
- Publish the container
Confirm the Pixel is firing
Don’t skip this step.
In Events Manager:
- Open your Pixel
- Click Test Events
- Visit your website in another tab
- Confirm page activity appears
You can also use the Meta Pixel Helper to verify browser-side firing.
If the Pixel isn’t firing, don’t launch yet.
Set up Aggregated Event Measurement if relevant
For a basic traffic campaign, this may not block launch. But if you plan to run Sales or Leads campaigns soon, review domain verification and event prioritization in Meta’s business settings[^3].
Think of this as future-proofing. Traffic can run without a fully mature setup, but stronger tracking gives you better optimization options later.
Create the campaign in Ads Manager
Now go to Meta Ads Manager.
Open Ads Manager and click Create
From the main dashboard, click Create.
Meta will open the guided campaign flow.
Choose the campaign objective
Select Traffic.
If your account shows a simplified objective menu, choose the option meant to send people to a destination such as your website.
Name the campaign clearly
Use a naming system from the beginning. It matters as soon as you start testing.
A simple format:
Offer | Audience | Geo | Goal | Date
Example:
Free Guide | Broad Interest Test | US | LPV | 2026-06
Decide whether to use Advantage Campaign Budget
If you’re launching one ad set, it’s usually easier to control budget at the ad set level.
If you’re testing multiple ad sets, Advantage Campaign Budget can help Meta shift spend automatically. That can be useful, but it also makes early learning less transparent for beginners.
For a first campaign, simpler is usually better.
Build the ad set: this is where traffic quality is won or lost
Most of the meaningful quality controls sit here.
Choose Website as the conversion location
In the ad set, choose Website as the destination or conversion location when prompted.
Some accounts default to messaging, app, or other destinations, so it’s worth checking.
Set the performance goal to landing page views when available
If Meta offers Landing Page Views, choose it.
If your account uses slightly different wording, pick the option closest to a completed page load rather than just clicks.
This is one of the biggest quality filters in the setup.
Set a realistic daily budget
For many beginners, $10 to $30 per ad set per day is a reasonable test range. It’s not a rule. CPMs vary a lot by niche and geography.
A practical starting point:
- local service business: start near the lower end
- competitive e-commerce or finance niche: expect to need more data and possibly more spend
- small test with one audience and one ad: keep it controlled
The goal isn’t to buy huge volume immediately. It’s to generate enough data to judge quality.
Choose location, age, language, and audience targeting
Start with the fields that actually matter:
- Location: include only the countries, regions, or cities you serve
- Age: keep it broad unless your offer clearly requires a narrower range
- Language: use this only if your market is multilingual and the ad is language-specific
For audience targeting, beginners often overdo it. They stack too many interests and end up with an audience that is narrow, expensive, and harder for Meta to optimize.
A better rule:
- if your offer is broad, start broad or lightly constrained
- if your offer is niche, regulated, or role-specific, narrow more deliberately
Example:
A general business growth guide can target broad entrepreneur or small business interests.
A B2B tax compliance service for dentists should be much tighter.
Use custom audiences and exclusions if available
If you have existing data, add exclusions such as:
- existing customers
- recent purchasers
- employees
- recent site converters
- internal traffic
This is one of the easiest ways to reduce wasted spend.
If you already have decent traffic, you can build a retargeting audience later. For your first campaign, keep the setup focused on cold traffic.
Select placements carefully instead of accepting everything by default
Meta often recommends Advantage+ placements, and sometimes that works very well. That’s the strongest argument for letting the system handle delivery: it can reduce costs and find inventory you might not have chosen yourself.
Still, if your main concern is traffic quality, more control often makes early results easier to interpret.
A cautious starting setup:
- Facebook Feed
- Instagram Feed
- Facebook Stories
- Instagram Stories
- Reels only if your creative fits the format
Be careful with low-friction inventory if you can’t monitor placement-level quality closely. In some accounts, very cheap placements produce weaker visits. That isn’t universal, but it happens often enough to justify caution.
Schedule the campaign
If you don’t have historical performance data, let the campaign run continuously.
Dayparting sounds sophisticated, but it usually becomes useful later—not at launch.
Create the ad itself
Now move to the ad level.
Choose the Facebook Page and Instagram account
Select the Facebook Page connected to the business.
Then connect or choose the Instagram account if you want delivery there too. If no Instagram account is connected, Meta may still run ads from the Page in some placements, but using the proper branded identity is usually better.
Pick a simple ad format
For a first campaign, use:
- Single image, or
- Single video
Carousel can work, but it adds more moving parts. Simpler setups are easier to diagnose.
Add the website URL
Paste the exact landing page URL.
Double-check:
- correct page
- no 404
- mobile-friendly destination
- acceptable load speed
- optional UTM parameters attached
A simple UTM example:
?utm_source=facebook&utm_medium=paid_social&utm_campaign=free_guide_lpv_test
Write primary text, headline, and description
Keep message match tight. If the ad promises one thing and the page delivers another, quality drops fast.
A simple formula:
Problem/benefit hook + clear value + low-friction next step
Example:
- Primary text: Struggling to turn social traffic into real website visitors? This guide shows the setup choices that improve traffic quality, not just click volume.
- Headline: Learn the Facebook Traffic Setup
- Description: Step-by-step Meta Ads walkthrough
- CTA: Learn More
Avoid curiosity bait unless the landing page fully delivers on it.
Choose a call to action button
Match the CTA to the page:
- Learn More for educational content or service pages
- Shop Now for product pages
- Get Quote only if the landing page supports that intent
Most traffic campaigns work best with low-friction CTAs.
Add a clean image or video
Use a visual that is easy to understand on mobile.
A strong traffic ad usually does one of two things well:
- clearly shows the offer, or
- clearly calls out the problem it solves
Don’t try to win with design complexity. Clarity matters more.
Check the preview for every placement
Preview the ad across placements before publishing.
Look for:
- cropped text
- awkward image cutoffs
- hard-to-read overlays
- bad Story or Reel formatting
- mismatched headline display
This small step prevents a surprising number of weak launches.
Publish, then verify everything before spending meaningfully
Click Publish
Once everything looks right, click Publish.
Meta will submit the ad for review.
Watch for approval issues
Check for:
- policy rejections
- disapproved creative
- restricted wording
- destination issues
Fix these before trying to optimize anything else.
Use the Pixel Helper or Events Manager test tools
Open your landing page and confirm the Pixel fires.
If possible, test from the live ad once it starts delivering.
Check that landing page views are being recorded
Inside Ads Manager, add columns that show:
- link clicks
- landing page views
- cost per landing page view
- outbound CTR
- CPC
Then compare those numbers with your web analytics.
A campaign can look live inside Meta while still being broken operationally if the page is slow or tracking is incomplete.
Monitor outbound CTR, CPC, and bounce signals
Don’t stop at Meta metrics.
In Google Analytics, look for:
- engaged sessions
- average engagement time
- pages per session
- bounce-related indicators
- micro-conversions such as signup starts
A slightly more expensive click can still be the better click.
The first 72 hours: how to improve cost without ruining learning
The biggest beginner mistake after launch is over-editing.
What not to edit too early
Don’t keep changing:
- budget
- targeting
- placements
- creative
- optimization goal
unless something is clearly broken.
Meta’s system needs enough delivery to stabilize. On small budgets, that can take longer than beginners expect.
When to pause an ad set
Pause when:
- spend is building but landing page views are unusually weak
- the traffic reaches the site but engagement is clearly poor
- the geography or audience is obviously wrong
- the URL or page experience is broken
Don’t pause because of one noisy day.
What to test first: creative, audience, or placements
In many accounts, creative is the best first lever.
Why? Because creative affects both click-through rate and self-selection. Better creative doesn’t just attract more clicks. It attracts more of the right clicks.
A common pattern looks like this:
A beginner launches with all placements and link click optimization. CPC looks great, but landing page views are low and sessions bounce quickly. They switch to LPV optimization, tighten geography, remove weaker placements, and rewrite the ad to match the page more closely. CPC rises a bit, but cost per engaged session improves. That is often a worthwhile trade.
How to judge traffic quality in analytics
Use this simple sequence:
-
Click to LPV rate
If clicks are much higher than LPVs, investigate page speed or low-intent clicks. -
LPV to engaged session quality
Are visitors staying, scrolling, or viewing more than one page? -
Engagement to business outcome
Are they starting forms, joining your email list, or viewing key pages?
That chain tells you far more than CPC alone.
Common failure points beginners hit
Optimizing for clicks instead of page views
This is the classic trap. Cheap clicks are often vanity metrics.
Sending traffic to a weak or slow page
A strong ad can’t rescue a page that loads slowly, especially on mobile.
Using audiences that are too narrow
Over-stacked interests can limit delivery and raise costs without improving quality.
Trusting all placements equally
Some placements are excellent. Some are just cheap. Verify rather than assume.
Changing budgets and targeting too often
If you keep resetting variables, you never really learn what worked.
If you decide you don’t want to manage the testing and optimization yourself, a managed traffic service such as Traffics.io can make sense for businesses that want outside help with acquisition rather than a DIY setup.
Conclusion
Useful Facebook traffic rarely comes from one clever targeting trick. It comes from disciplined setup.
The core idea is simple: cheap traffic is easy to buy, but qualified traffic depends on the choices you make before launch and the restraint you show after it goes live. Choose the right objective, install the Pixel, optimize for landing page views, keep your targeting clean, be selective with placements, and judge performance using both Meta data and on-site analytics.
If you’re starting from zero, the next step is straightforward: set up your business assets in Meta, install the Pixel, and launch one small LPV-focused traffic campaign before trying to scale. That will teach you more than hours of theory—and save you from paying for a lot of clicks that never really mattered.
FAQ
What campaign objective should I choose in Facebook Ads to get website traffic?
Choose the Traffic objective if your goal is to send people to your website and you don’t yet have enough conversion data for Meta to optimize reliably for deeper actions. If your account already generates steady lead or purchase events, Sales or Leads can sometimes produce higher-quality visitors because Meta can optimize for outcomes beyond the visit.
Is landing page views better than link clicks?
Usually, yes. Landing page views are generally a better optimization target than link clicks because Meta counts them only after the destination page begins to load. That helps filter out some accidental or low-intent clicks. It’s not a guarantee of good traffic, but it’s a stronger quality signal than raw click volume.
Do I need a Meta Pixel for a traffic campaign?
Yes, if you want serious measurement and future optimization. Even if you start with a traffic campaign, the Meta Pixel helps you verify visits, build remarketing audiences, track downstream actions, and prepare for future Leads or Sales campaigns.
How do I create a Facebook ad account from scratch?
Start with a personal Facebook profile, then go to Meta Business Suite or Ads Manager. Create a business portfolio, add an ad account, set your account name, time zone, and currency carefully, and then add a payment method. These setup choices affect billing and reporting and can be difficult to change later.
What is a realistic starter budget for Facebook traffic ads?
For many beginners, a small daily test budget such as $10 to $30 per ad set is enough to start learning, but there’s no universal rule. The right budget depends on CPMs in your niche, your geography, audience size, and how quickly you need enough data to evaluate landing page views and on-site engagement.
Should beginners use Advantage+ placements or manual placements?
It depends on the goal. Advantage+ placements can reduce costs and work well in some accounts, but beginners who care about traffic quality often benefit from more control early on. A cautious starting point is to focus on Facebook and Instagram feeds, Stories, and other placements that fit the creative, then expand once you understand placement-level quality.
Why am I getting cheap clicks but poor website engagement?
Cheap clicks often mean the campaign is optimized for volume, not quality. Common causes include using link click optimization instead of landing page views, low-quality placements, weak audience fit, slow landing pages, or poor message match between the ad and the page.
What should I check before publishing my Facebook traffic campaign?
Confirm the website URL is correct, the Meta Pixel is firing, landing page views can be recorded, the ad preview looks right across placements, your CTA matches the page, and your budget, geography, and exclusions are correct. A campaign can go live while still being broken operationally.
How long should I wait before editing a new Facebook ad campaign?
Avoid changing a new campaign too quickly unless something is clearly broken. Early edits to budget, targeting, placements, or creative can interrupt learning and make results harder to interpret. Let the campaign gather enough impressions and landing page views to reveal patterns rather than reacting to a handful of clicks.
When should I switch from a Traffic campaign to a Sales or Leads campaign?
Switch when you have reliable tracking and enough meaningful conversion volume for Meta to optimize beyond visits. If your site is already getting consistent leads, purchases, or other strong signals, a deeper objective can often outperform Traffic by sending visitors who are more likely to complete the action you actually care about.